Some Little Good
  • Home
  • Blog
    • Art
    • Books
    • Recipes
    • Crafts
      • Sewing
      • Embroidery
      • Paper
      • Knitting & Crochet
    • Daily Life
    • Shop Talk
  • Shop
    • Etsy
    • Redbubble
  • About

I indicated in my last Small Bear post that I was constructing a home for Small Bear . . . on paper, of course. Before I reveal my sketch of his kitchen, I thought I'd share the story behind the why of his house.

My first paintings of Small Bear were in a very minimalist style; think lots of white space. If you're familiar with the British cartoon Kipper, you'll know what I'm talking about.

As his personality developed I began to paint more detailed pictures, but sometimes my finished product felt like something was missing.


 This is the picture that sparked the idea for Small Bear's house.

Notice anything? Yeah, me neither . . . and that's the point.

The problem was that I didn't have an established setting. This left the pictures short on detail and looking bland.

So I decided to create a home-sweet-home for Small Bear. The purpose of his drafted home is to provide a framework for the background in my finished artwork.


Last time Small Bear invited you into his Living Room. Today he wants to show you his kitchen. Please keep in mind that he hasn't painted yet.


See Small Bear up there on the left? He's still reaching for his honey pot.I think Small Bear might need a stool!

This drawing shows three different walls in the kitchen. There's a little diagram in the top right corner that displays the layout. Small Bear's kitchen has an old-fashioned charm.  He has an antique oven at one end of the kitchen, large pine tables for rolling pie crusts, lots of shelving to hold his favorites sweets, and quaint wallpaper in a soft green.

I'm afraid we'll have to conclude this behind the scene tour now because Small Bear needs my help getting his scones out of the oven!

~ Brittany

I wanted to share another peak into my sketchbook with you.  I drew this tiger and cub from a picture I found.  My focus on this was to create a border around the picture.  I looked up flowers found in India and used those as my inspiration.

Hibiscus (top right corner)
Plumeria (bottom right corner)
Peacock flowers (bottom left corner)
Azaleas (top left corner)

I need a reference source for the flowers that shows them all in the same context.  Because I used a jumble of online resources, I'm not sure if I got the flowers proportioned to each other properly. But otherwise, I really enjoyed the process and liked the end result. 

What are you drawing?
~ Bridget

My older brother is a huge pocket journal fan, and he asked me to jazz some up. I created six different designs for him; this is how I painted the mountain design.


What you'll need:
A notebook 
A sheet of clean paper
Black India ink
#00 round brush
#2 fan brush
pencil


Lay your journal flat on a sheet of white paper to protect the pages ( Don't use newspaper! The ink will rub off on your pages.)  

I have a reference picture that I already designed, and I use that as a "guide". My guide is a tool of inspiration, not a dictator. Each journal is unique.


Here is what it looks like sketched on the journal.
I always draw lightly, that way if I don't like the way something is turning out I can erase it.

Since watercolor paint bleeds when it gets wet, I use India ink. Because it's permanent ink, it allows the journal to live up to its outdoorsy name . . .
"Field Notes
... durable ..." 


Using my #00 round brush I outline the mountains first.
I'm always a little nervous when I start with the ink, but that turns out in my favor. Shaky hands make a more realistic mountain!


Then I fill in all the crevices with the same brush.


To paint the grass I use a DRY #2 fan brush (If you get the brush wet then all the bristles will stick together and there won't be separate blades of grass). I dab just the edges of the brush in some ink and then pat them on a dry portion of the plate. Then I gently brush the ink onto the journal using the pencil line as a guide. If you drag the brush you end up with long blades of grass; Dab the brush and you'll get short blades.


Let it dry for a few hours and then it's finished!


~ Brittany
Hand painted journals available in our Etsy shop.


God writes the Gospel not in the Bible alone, 
but also on trees, and in the flowers and clouds and stars.
~ Martin Luther ~

This pincushion started with the rose fabric.  Once I chose that fabric, I cut out a 9-inch circle and then matched my embroidery floss to the fabric. I used the following:

DMC #961, rosy pink
DMC #221, wine red
DMC #3052, light green
DMC #3051, dark green
 

I cut a 9-inch circle out of coordinating felt and also two 9-inch circles of interfacing.


With one circle of interfacing on the back of the cream felt, I embroidered eight rambling roses evenly spaced around the circle. I used the rosy pink floss, #961.

The interfacing is optional, but I do find that it helps keep the back threads hidden from showing on the front.  It also helps stabilize the knots, so they don't pull through.


Here's what it looks like with the roses all completed and evenly spaced.


To add the greenery, I started with the light green, #3052.  I made a small straight stitch, angled upward, about half way down on the left side of each rose  I then made three lazy daisy stitches, one on each side of the stem and one at the tip of the stem.


Using the dark green, #3051, I repeated the exact same steps on the right side of each rose.  Then I added two lazy daisy stitches (with no stem), peeping out from under the rose, each at a slight angle.


To round out the design, I added French knots scattered about (not always the exact same number, but about seven or eight).  I used the dark wine color, #221.


Here you can see the progression of each step. 


Embroidery all done . . . 


. . . ready to sew together! 

~ Jodi

Small Bear's house has been under renovation these last few weeks.
There is now a floor plan for his home, and there will be detailed sketches of each room.

The living room is almost finished. 
I still have a few small changes I want to make,
 but the furniture arrangement will stay the same for the most part. 

I filled in this sketch with  colored pencils just to start playing with the color choices

However, the color palette is still a work in progress.
 I wanted Small Bear's house to have a cozy, informal feel to it. The brown fireplace in the first drawing seemed too dark and formal.  So I drew three other options and have been playing around with coloring and flooring.  The watercolor stripes on the lower corner are all colors that I know I'm using in his living room.  I think, the fireplace on the left is the one I prefer.

~ Brittany
Embroidery completed.

Trim the fabric leaving about 1 inch around the hoop (just to make it easier to manage).

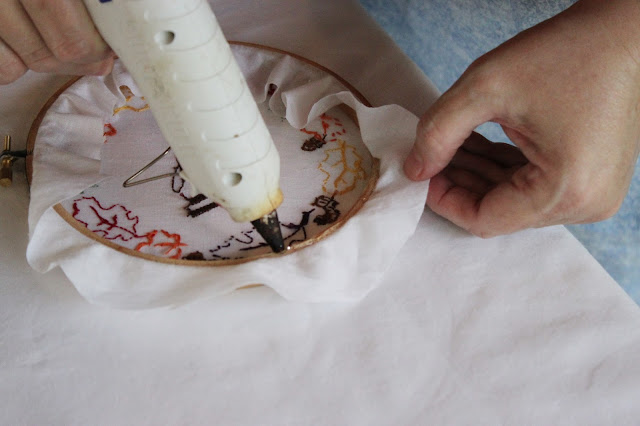
 Hot glue around the edge of the inside hoop, and ...

 pull fabric tightly and press into glue.  Be careful ... the hot glue can come through the fabric.

 Press around the edges to make sure glue is tight.

 Trim the excess fabric by running the scissors along the edge of the hoop.

 Here's what the back will look like.  It can be hung just like this ... or ...
cut out a felt backing the same size as the hoop.  Add a thread hanger to the felt.

 Hot glue the felt to the hoop frame.  A glue stick makes a nice smoothing tool.

Happy fall!

~ Jodi

I start a new hoop art design by tracing the outside edge of my inside hoop.  Then I lay out my design lightly in pencil.  When I'm happy with it, I color it in so I can tweak my color choices before I start embroidering.  I sometimes use lined paper because it helps me to center my design.

The embroidery on this project is actually completed; I'll share that tomorrow ...

~ Jodi


This week we created a customized card to make the journey with one of our customized name banners for a young, Nancy Drew lover.


We edited an existing SLG graphic to "magnify" Happy Birthday.
 

Cut out a sweet little envelope from scrap booking cardstock and hot glued it into the card.  Added a tag stamped with "Top Secret" on one side and "Sophia Only" on the other.


Used font "Lucida Sans Typewriter" to type the message on parchment cardstock.  Folded the "secret" message in half, tucked it in the envelope and tied it up with ribbon.

I hope we have a happy little detective when the package arrives!
Newer Posts Older Posts Home

Welcome to Some Little Good!


Here at SLG our desire is to bring beauty to the everyday moments in life. We believe that the little things are often the most important, that the practical can be lovely, and that a heart full of thankfulness reveals beauty.

As you visit with us, you can expect to find art tutorials, book reviews, recipes, and craft projects . . . Some Little Good that helps us to celebrate and accomplish the little things in life and brings a bit of joy to our homes.

Read more about us HERE.

Connect With Us


Recent Posts

  • Learning How to Knit Stranded Colorwork
  • Snow // Winter Mini Art Print
  • 2023 Flowers and Poetry Calendar: Now Available!
This site is ©2013-2021 by JC, BC and BA Deputy. Powered by Blogger.

Visit Our Etsy Shop

Categories

  • art 27
  • books 14
  • crafts 16
  • daily life 8
  • recipes 4
  • shop news 6

Archive

  • ►  2023 (3)
    • February (1)
    • January (2)
  • ►  2022 (17)
    • October (2)
    • September (1)
    • August (1)
    • July (3)
    • June (4)
    • May (1)
    • April (1)
    • March (3)
    • February (1)
  • ►  2021 (11)
    • November (1)
    • October (6)
    • September (3)
    • January (1)
  • ►  2017 (5)
    • March (2)
    • February (3)
  • ►  2016 (18)
    • December (4)
    • November (1)
    • October (7)
    • September (5)
    • March (1)
  • ▼  2015 (16)
    • November (6)
    • October (9)
    • September (1)
  • ►  2014 (4)
    • August (3)
    • May (1)

Get in touch with us!

Name

Email *

Message *

Copyright ©2014- Some Little Good. Designed by OddThemes